Categories
Uncategorized

project setup for Grails with customized plugins using git submodules

Starting with it’s initial version a couple of years ago, Grails comes with a very nice predefined project structure, e.g. domain classes go into grails-app/domain. Every artefact has its well defined location. Almost every Grails application doing a little more than a simple “Hello world” will use at some extend one or more of the 500+ available plugins. The easiest way is to add plugins by using

grails install-plugin <pluginname>

The plugin gets downloaded from the central repository and added into your application, either in application.properties or into grails-app/conf/BuildConfig.groovy (default for Grails 2.0). In both cases the application contains only a reference to the installed version number.

This approach works very nice as long as you don’t have to change anything inside the plugin. I’ve had multiple times the necessity to modify external plugins, due to fixing bugs or due to some special requirements that are not yet covered by the existing released version. To deal with this, there are a couple of approaches:

1) most naive:

The most simple thing to do is just opening the plugin’s source files using your IDE and make your modifications. This has some real downsides:

  • your changes will be lost whenever you install a new upstream version of the plugin
  • since Grails unpacks installed plugins by default into $HOME/.grails/<grailsversion>/projects/bullseye2/plugins/<pluginname>, your changes are not part of any SCM and only reside locally.

I’ve warned you! Don’t do this!

2) build customized plugins in a seperated location

  • download the sources of the desired plugin, unpack it outside your main application
  • modify the plugins
  • create ‘your’ version: grails package-plugin
  • switch to your application and install the generated plugin: grails install-plugin <zipfile>

This approach annoys me, since you need to repeat the ‘package-plugin’/’install-plugin’ cycle for each an every change in the plugin. So inline-plugins to the rescue…

3) use inline plugins and copy the plugin’s sources into your application’s repo

Grails has the ability to use ‘inline plugin’. There are a couple of nice blog posts covering this, so I’m just using Burt Beckwith’s slides as a reference. You basically unzip the plugin’s zip artefact into some folder inside your application (e.g. plugins folder), reference it in grails-app/conf/BuildConfig.groovy and add the extracted files to your application’s repo.
In that case you’ve basically created a diverging copy of the plugin. Whenever there’s a new release of the plugin, integrating this back into your app might become a pita. You need to reapply your changes on top of the version of the plugin. That’s doable, but requires some advanced git technique, is error prone and can consume a lot of time – I know what I’m talking about here, trust me! Another major downside is that your local fixes and improvements are not easy to contribute back to upstream.

4) use inline plugins with git submodule

At that point, I’m expecting that you’re already using git for your project. If not, NOW is the time to do this and familiarize yourself with git. It’s worth it, promised!

  • create a distinct folder inside your project, e.g. ‘plugins’ that will contain all customized plugins
  • Find out the location of the plugin’s scm. A lot of plugins host their sources now on github. If so, fork this repository on github. If it’s using svn, you could mirror it to github, see a nice blog post for this. Basically you have now a forked plugin available on github.
  • clone the forded repo into your project, I’m using the spring-security-ui plugin here as example:
    $ git submodule add git://github.com/sarmbruster/grails-spring-security-ui.git plugins/grails-spring-security-ui
    Cloning into plugins/grails-spring-security-ui...
    done.
    
    $ git status
    # On branch master
    # Changes to be committed:
    #   (use "git reset HEAD ..." to unstage)
    #
    #	new file:   .gitmodules
    #	new file:   plugins/grails-spring-security-ui
    #
    
    git add .gitmodules plugins/
    git commit -m "added submodule"

    The nice thing is that your application’s repo contains now a reference to the plugin’s repo and it even remembers the sha-id of the plugin you’re currently using.

  • now add plugins/grails-spring-security-ui as a inline plugin by adding to grails-app/conf/BuildConfig.groovy
    grails.plugin.location.'spring-security-ui'="plugins/grails-spring-security-ui"
  • push your changes
  • last but not least ask your collaborators on the project to pull your changes, let them do git submodule update --init. This command is only required once for each working copy.

The really nice thing about this setup is that you can easily share your plugin changes to the upstream repository by a pullrequest. And the other way is also pretty easy: when the upstream author accepts your pullrequest and/or adds a some new functionality you can directly consume this by going to your plugin’s directory and use

$ git fetch upstream
$ git merge upstream/master

NB: this results in a to-be-committed change in the upstream repo since the sha-id of the referenced repo has changed.

some notes
  • whenever you commit something to a submodule the parent repo will have a non-empty status since your copy now references another another sha-id.
  • choose the URL of the custom plugin repo carefully. If you’re the only developer make changes in the plugin, you might use the repo’s public address and override locally the push url to your private URL by
    $ git remote set-url --push git@github.com:sarmbruster/grails-spring-security-ui.git

    Now there’s a difference in fetch and push URLs:

    $ git remote -v
    origin    git://github.com/sarmbruster/grails-spring-security-ui.git (fetch)
    origin    git@github.com:sarmbruster/grails-spring-security-ui.git (push)

    Your collaborators will only get the public fetch URL for both and won’t be able to commit to your private repo (that’s why we’re calling it private, right?).

    The other scenario is when you want multiple developers commit to the plugin repo. In this case you need to grant them access to your private repo (or even set up a github organization for that) and use the private URL in the ‘git submodule add’ command.

Contributing your changes back to the plugin upstream repo is very well explained at Fork a repo.

Conclusion

With the approach explained you’re able to customize any plugin and track the plugin changes from your applications repo. Contributing your bugfixes and improvements back to the upstream author is a piece of cake now as well as benefiting from upstream changes.

I’d be greedly waiting for your thoughts and for discussion on this setup. Combining this with git-flow looks like a kind of best practice for Grails projects – at least for me.
Categories
Uncategorized

embedding the git/hg/svn’s revision number inside a grails application


When your application goes to production, you should be prepared for handling bugs. Users and customers will find them and hopefully report them. I’ve been multiple times in a situation where a well written bug report including a stacktrace doesn’t help me much because the stacktrace doesn’t match the current development state of the code. Therefore it simplifies life if the bug report contains a build number or a SCM revision number. With this small recipe, you can easily add this information to your application.

Find out your current SCM revision

Every version control system does this differently, so here’s a short summary of what command might be used for what SCM:

SCM command to get revision information
Mercurial hg id -i -n -b -t
Git git rev-parse HEAD
Subversion svnversion

If your SCM of choice is not listed and you know the command, please let me know by posting a comment.

Create a template that contains the revision information

For the following, I’ll use mercurial, it should be easy to adopt this to the SCM of choice. Using a Gant-Script scripts/_Events.groovy you could hook into the build process and easily generate a Grails template that just contains the output of one of the above commands.

eventCompileStart = { msg ->
    def proc = "hg id -i -n -b -t".execute()
    proc.waitFor()
    new FileOutputStream("grails-app/views/_version.gsp", false) << proc.in.text
}

This recreated grails-app/views/_version.gsp upon each build, so we’re sure to have always the most recent revision ids there. It is crucial that the file containing the revision information is itself not under version control. To exclude this file you have to list it in .hgignore, .gitignore or use svn propedit svn:ignore.

Using the _version.gsp template

The final step is to embed the previously created _version.gsp somewhere in your code. For my usecase, I want to have the revision ids available on each and every page, so I’ll put it into the layout template grails-app/views/layout/main.gsp:

<div >
<p><g:message code="meta.app.version" default="Version: {0}" args="[meta(name: 'app.version')]"/>  SCM: <g:render template="/version"/></p>
</div>

Be sure not to omit the leading “/” in the g:render tag, otherwise _version.gsp gets not found in case of a deeper nested view path.

Categories
Uncategorized

a perfect team: Grails Taggable plugin and JQuery Tagit

In a recent Grails project the customer asked for support of a tagging functionality for some domain classes. In order not to clutter the tagspace too much auto-complete should be available when editing the tags.

In fact there is a very simple and elegant solution for this. On the application’s side, there’s the Grails Taggable plugin available. For the frontend side JQuery has a nice plugin called  Tagit plugin caring about editing tags and auto-completion. Both play together very well – showing this is the intention of this post.

Setting up the ‘to-be-tagged’ domain class

After installing the taggable plugin the usual way using

grails install-plugin taggable

setting up the ‘to-be-tagged’ domain classes is fairly trivial, the only thing left is to add ‘implements Taggable’ to the ‘to-be-tagged’ domain classes, e.g.

import org.grails.taggable.Taggable
class Product implements Taggable {
    String name
    double price
}

By marking the domain class with the taggable interface it gets injected some methods for manipulating its tags on instance level

  • addTag,
  • addTags,
  • getTags,
  • parseTags,
  • removeTag,
  • setTags

as well as some new methods on class level:

  • getAllTags,
  • getTotalTags,
  • countByTag.

Setting up JQuery Tagit in the Grails application

Since the Tagit plugin depends on JQueryUI for autocompletion, lets first install this in the application. Using the resources plugin for managing our css/js/image resources is also a good idea:

grails install-plugin jquery-ui
grails install-plugin resources

Download an unzip the latest version of tagit (1.5 when authoring this post) to some temporary location. We basically need to copy three files contained in the zip:

  • tagit/js/tagit.js to <grailsapp>/web-app/js
  • one of tagit/css/tagit-<yourchoice>.css and tagit/css/ui-anim_basic_16x16.gif to <grailsapp>/web-app/css

Since we’ve added resources to our project let’s declare them as a module for the resources plugin. For more information on this concept, checkout the docs of the Grails resources plugin.

modules = {
 'tagit' {
 dependsOn 'jquery-ui'
 resource 'css/tagit-gradient-blue.css'
 resource 'js/jquery/tagit.js'
 }
}

Editing the view

Next thing is the frontend. To get started, let’s generate a controller and views for the given domain class:

grails generate-all Product

For simplicity, we’ll only care about the edit view for the rest of this post. The code of the generated view is the starting point. First we need to make use of the declared resources and second we need to render the already existing tags and apply the tagit plugin.

...
<%-- in the head section --%>
...
<%-- in the form section --%>
$(function() { $(“ul[name=’tags’]”).tagit({select:true, tagSource: “${g.createLink(action: ‘tags’)}”}); });

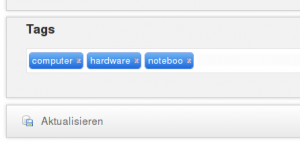
Tags

  • ${it}

L.3 adds the js/css resources. L.9 is requires some explanation, we’re decorating the ul tag having an attribute name='tags' with the tagit widget. The parameter select=true is crucial since it passes back the chosen tags upon form submission as a multivalued select-box. Specifying a tagSource URL provides auto-completion. In l.15-19 we’re displaying the existing tags in a simple unordered list. N.B. the name attribute mirrors the name of the select-box being created.

Editing the controller

The ProductController must be modified to store given tags upon form submission and to provide auto-completion. For storing tags, the update action requires a single line change:

productInstance.properties = params
productInstance.tags = params.tags // new line to be inserted

tags isn’t a real property it is not covered by l.69 and an explicit call to setTags() is necessary.

For auto-completion a new action tags is introduced:

def tags = {
  render Tag.findAllByNameIlike("${params.term}%")*.name as JSON
}

JQuery-UI auto-completion passes the partially entered tag in request parameter term. The code above searches for all tags starting with the given term and returns their name as JSON.

Result & Conclusion

With these very few lines of code a comfortable user interface for tagging with auto-completion could be established. Kudos to the authors of the JQuery Tagit and Grails Taggable plugins. These two plugins are a perfect match.

Categories
Uncategorized

Grails Searchable plugin: fighting down OOME when rebuilding the search index

In one of my projects we store blob data (word documents, pdfs,…) in a Grails domain class. This data should all be indexed by a search engine and provide a convenient search interface. Pretty easy to solve using the Grails Searchable plugin – customer satisfied.

The project went live, everything was fine the first time. Until a certain point, we found that rebuilding the index throwed OutOfMemoryException (OOME). Nothing unusual in the java world,  increasing -Xmx helped out for some time.

With a growing set of data we reached a point where -Xmx comes near the size of physical RAM in the machine. Plugging more RAM is not an option here, so I’ve decided to tackle down the cause of this.

After some debugging session I’ve found out that rebuilding the index is performed in batches. Grails Searchable uses the Compass Framework under the hood. Compass  uses a default batch size of 200. For whatever reason the Grails searchable plugin superseeds that to a fixed (!) value of 5000. This means that during indexing 5000 database rows (each one holding a megabyte-sized blob) are read into RAM and then stored in the index! As long as there are no blobs in the database 5000 might be a good value, the larger the batch size the faster indexing will work.

The best solution here would be a configuration parameter for the fetchCount, I’ve filed an JIRA for this. Until this is fixed, thers a workaround: reconfigure the compassGpsDevice bean in the application’s resources.groovy like this

compassGpsDevice(HibernateGpsDevice) { bean ->
    bean.destroyMethod = "stop"
    name = "hibernate"
    sessionFactory = ref("sessionFactory")
    fetchCount = 200
}

Mission Accomplished.

Categories
Uncategorized

using Redmine with IntelliJ X EAP

Since the times when I’ve started using Grails some years ago, I became a passionate user of IntelliJ IDEA. Basically the single one thing I’ve been missing when moving over from Eclipse was the lack of something like Mylyn. Since version 9, IntelliJ comes up with basic task and context management features. Support for Jira has always been great by a plugin from Atlassian.  Redmine is the also a great issue tracker/wiki/project management application. But there was no IDE integration into IntelliJ so far. The upcoming IntelliJ X version has support for this in their latest EAP.

It took me some time to figure out how that works, so I want to share what I’ve found out so far:

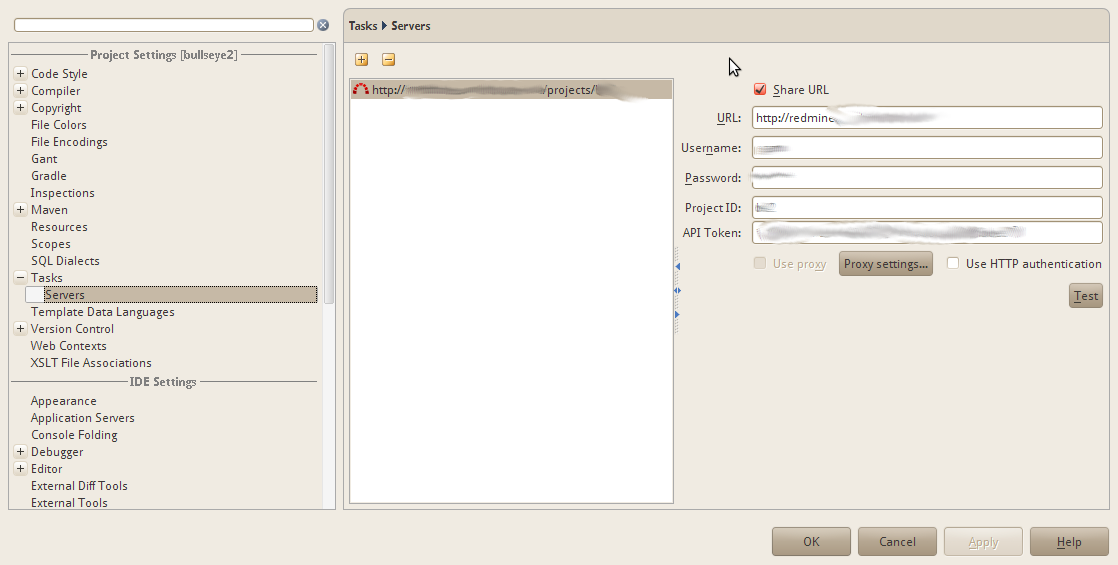
  • go to File|Settings dialog, select Tasks|Servers
  • add a redmine server
    IntelliJ settings dialog

    The API Token must be taken from the “My account” page, link “API Access Key”. The project ID is the short project identifier found on Redmine’s project settings page

  • test and validate the connection
  • apply the changes in settings dialog
  • Open a new task (Alt-Shift-N)
  • Enter either the id or a word contained in the issue’s title and press Crtl-Space to find matching issues from redmine.
  • Select one of the issues being found and create a new context and changelist for that one.

Having the redmine tasks in the IDE will be a big time safer for me.

Update:

If your redmine server uses https with a self-signed certificate, you must append the certifacte to JVM’s keystore: http://www.chrissearle.org/node/260

Categories
Uncategorized

Grails countries plugin 0.2 released

Thanks to the contributions of other hackers I’m announcing the 0.2 release of the Grails countries plugin. The changes:

  • added languages for country and continent names:
  • country list is now maintained outside CountryBootstrap.groovy in seperate csv files
  • reworked properties file to consistently use ISO-3166 3-letter-code as key
Categories
Uncategorized

new Grails plugin: Countries

A common requirement in many applications is to deal with countries and/or continents. The plugin’s goal is to apply the DRY principle to these requirements.

In short, the plugin offers:

  • populated domain classes for countries and continents
  • i18n for continent and country names (for now, only en and de locales). Currently there are 190 countries available.
  • tags for simple usage of
    • localized names for countries and continents
    • select boxes: for all countries, for all continents, for all countries of a continent or for a defined set of countries. The select box contents are automatically sorted by the the localized country/continent name.

resources:

For bug reports please use http://jira.codehaus.org, project “GrailsPlugins”, component “countries”.

Update: since the initial release requires the usage of Grails 1.3.4-SNAPSHOT a bugfix release 0.1.1 has been release shortly afterwards. 0.1.1 should work with Grails >= 1.0.

Categories
Uncategorized

Grails Neo4j plugin 0.3 released

Today I released an update of the Grails Neo4j plugin (http://www.grails.org/plugin/neo4j). The main changes are:

  • compatibility with Grails 1.3.x. Be aware, Grails 1.3 – 1.3.3 are suffering from http://jira.codehaus.org/browse/GRAILS-6427, so either use Grails 1.2.x, or be brave and use a recent git build of Grails 1.3.4.SNAPSHOT.
  • usage of Neo4j 1.1 (released today just a few hours ago, so get it while it’s hot).

All changes:

  • [GRAILSPLUGINS-2302] – “home” link broken in the org.codehaus.groovy.grails.plugins.neo4j.Neo4jController views
  • [GRAILSPLUGINS-2303] – Problems with annotation Neo4jEntity
  • [GRAILSPLUGINS-2345] – upgrade to Neo4j 1.1
  • [GRAILSPLUGINS-2346] – <domainclass>.get() throws exception if id is not invalid
  • [GRAILSPLUGINS-2347] – <domainClass>.findAllBy<Field>(value) fails
  • [GRAILSPLUGINS-2349] – provide compatibility for Grails 1.3.x
Categories
Uncategorized

getting a list of all i18n properties used in a Grails application

You might know this situation: in a project you start by hacking code that uses i18n properties instead of fixed strings in order to support multiple languages. The normal process in Grails is to use the g:message tag in controllers or gsp templates. Side by side you append the new introduced i18n property with some value in your messsages.properties file.

When support for a new language is requested, all you have to do is translating messages.properties. So far so good – this make i18n really easy.

But: when the project evolves, there’s a good chance that some of your i18n properties in messages.properties gets orphaned. Assume you remove a block of code from a gsp. It happens often that the i18n properties used in this block are not removed from messages*.properties because at some point you are not sure if it is referenced elsewhere. So what would be really useful here would be a list of all referenced i18n properties from your *.groovy/*.gsp files.

Doing so is pretty easy, just add a new gant script to your Grails application’s script folder, let’s name it i18nList.groovy. This script basically contains:

includeTargets << grailsScript("Init")

target(main: "create a list of all i18n properties used in groovy code and gsp templates") {

    def properties = []

    new File(".").eachFileRecurse {
        if (it.file) {
            switch (it) {
                case ~/.*\.groovy/:
                    def matcher = it.text =~ /code:\s*["'](.*?)["']/
                    matcher.each { properties << it[1] }
                    break
                case ~/.*\.gsp/:
                    def matcher = it.text =~ /code=["'](.*?)["']/
                    matcher.each { properties << it[1] }
                    break
            }
        }
    }
    println properties.sort().unique().join("\n")

}

setDefaultTarget(main)

(sorry the color coding seems to fail for some Groovy regexes) The script recursivly iterates over all *.groovy and *.gsp files in your project and extract the part after the ‘code’ attribute of the message tag using a regex. The regex result are collected into an array. This array is sorted, unique’d and printed to the console. That’s it.

One word of caution: this gant script ‘works for me’. So depending on your code, you might notice that the used regex are not sufficient or even fail. Feel free to modify them for your needs, even better send back your modifications.

Categories
Uncategorized

Grails Webdav Plugin 0.3 released

Today I’ve released a minor update to the Grails Webdav plugin. Compared with the previous version a few bugs have been fixed.