Even as a long term Neo4j user with a 10y+ experience I’ve stumbled over something being new to me. Therefore I thought it’s worth sharing.
Tag: neo4j
If you’re familiar with Neo4j most likely you’re aware that Neo4j delivers an offical docker image. This short post shows a script allowing you to bundle a Neo4j docker container with the latest version of Bloom – a graph visualization product from Neo4j. Additionally it bundles also the matching version of the APOC library to your docker container.
There are cases when you want to access your Neo4j instance remotely and you live in an environment where direct access is not possible. This might be caused by technical or organizational restrictions.
One generic solution to this kind of problems is using a VPN. Another alternative to be discussed in this blog post is using a reverse proxy server. I want to show how you can proxy Neo4j using Nginx.
Neo4j 3.2.0 was released last week at GraphConnect Europe. Among lots of cool new features, unfortunately it has one new “feature” making life of APOC users little bit harder, esp. if you run Neo4j from docker.
Background
Since 3.0 you can enrich Cypher with your own stored procedures. Those are written in Java (or any other JVM language) and get deployed to the /plugins folder. In 3.1 user defined functions were added, followed by aggregate functions in 3.2.
All of them use annotations like @Context GraphDatabaseService db to retrieve a reference to the database itself. For getting deeper into Neo4j’s machinery room one could have @Context GraphDatabaseAPI api allowing you full access. This full access can be abused to break out of the permissions system added in 3.1.
Therefore in 3.2. all procedures and functions run in a sandboxed environment disallowing potentially harmful dependencies like GraphDatabaseAPI from being injected. Using a config option dbms.security.procedures.unrestricted=<procedure names> you can deactivate the sandboxing for a given list of procedures. This config option also allows wildcards like *.
Couple of procedure/functions in APOC depend on using internal components and therefore need to be added as unrestricted procedures. This can be achieved by using apoc.* as value for this config option.
In a regular (aka non-docker) deployment you would just adopt conf/neo4j.conf with that setting.
And Docker?
When starting a Neo4j docker container you can dynamically amend config settings using -e. Everything starting with -e NEO4J_<configKey>=<convifgValue> will be amended to the config file. Be aware that dots need be rewritten with underscore.
There is a gotcha: trying to use `-e NEO4J_dbms_security_procedures_unrestricted=apoc.*` does not work since the shell expands the wildcard * with all file in current directory. Even apoc.\* doesn’t help. I suspect docker internally tries another expansion. What I found finally working is using three backslashes: -e NEO4J_dbms_security_procedures_unrestricted=apoc.\\\*
My typical docker command for firing up a throw-away database to be used for demos and trainings typically looks like this:
docker run --rm -e NEO4J_AUTH=none \
   -e NEO4J_dbms_security_procedures_unrestricted=apoc.\\\* \
   -v $PWD/plugins:/plugins \
   -p 7474:7474  -p 7687:7687 neo4j:3.2.0-enterprise
Of course, the apoc jar file needs to reside in plugins folder of the directory where the command is fired from.
This autumn I’ve attended couple of conferences. It’s always interesting to learn about new tools popping up. One that took my attention is Apache Zeppelin. Zeppelin is a notebook style application focussing on data analytics. I’ll show in this article how Zeppelin can be used to access data residing in your favourite graph database Neo4j.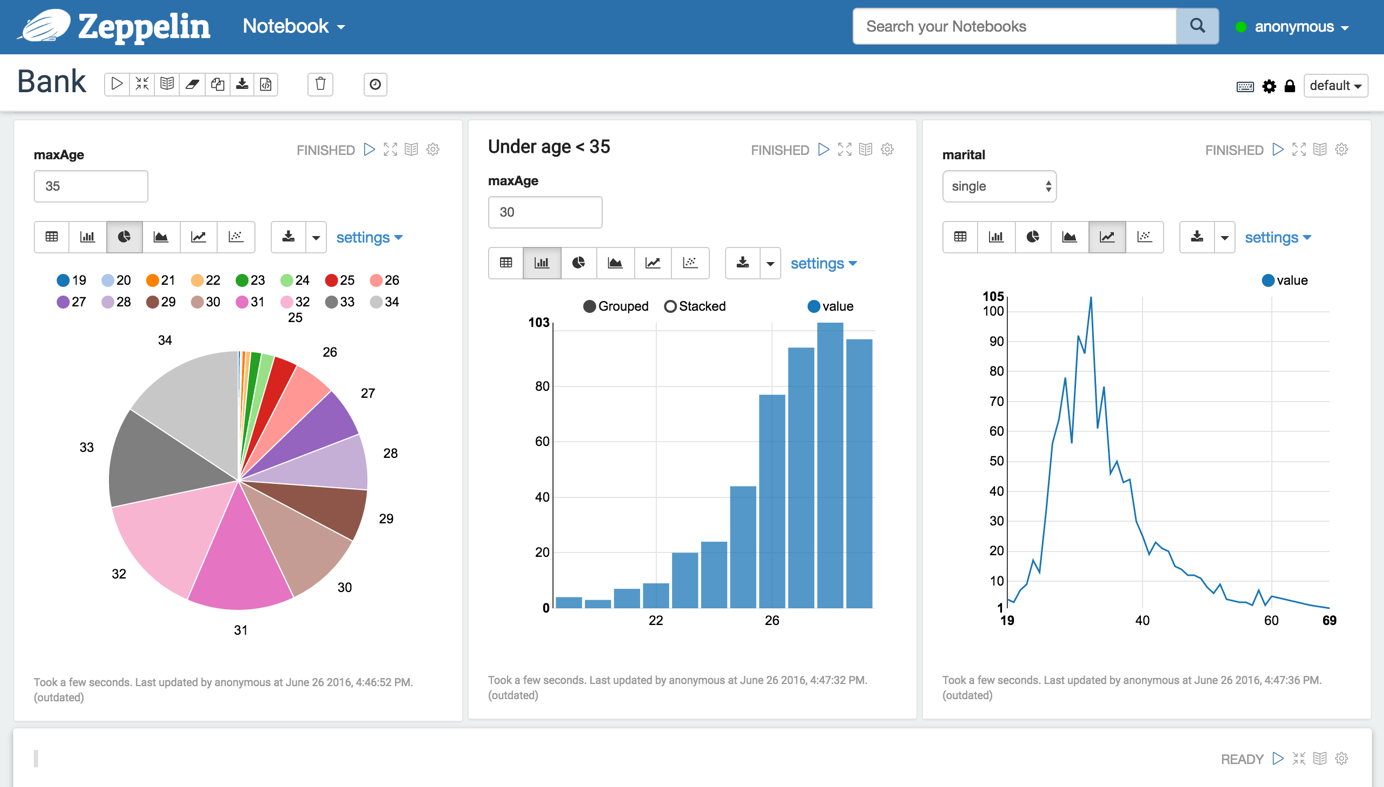
Categories
quick hint: neo4j backup via ssh
Neo4j Enterprise edition ships with a feature to take consistent backups while the database is up and running. Using config option dbms.backup.address you can expose the port to the outside.
However that port should not be exposed to public networks for two reasons. First the backup is transferred unencrypted and second no authentication is used. On online backups should only be used inside a trusted environment.
In couple of cases I wanted to grab a backup on a remote server and the only way to accessing it is via ssh. Nothing easier than this, see the following one-liner (be sure to scroll horizontally):
ssh <user>@<server> 'TARGET=`mktemp -d`; (neo4j-backup -from localhost -to $TARGET &> /dev/null); tar -zcf - -C $TARGET .; rm -rf $TARGET' > graph.db.tar.gz
First we create a temporary directory to be used as target for the backup. On most systems this is created under /tmp, so be sure to have enough available space there.
It’s important to mute the call to neo4j-backup in order to not pollute the transferred archive with textual report output of neo4j-backup – therefore we redirect stdout and stderr to /dev/null.
Next step is transferring the target directory as gzipped tar archive over the wire and store it locally. As last step the temporary directory gets deleted.
This blog post quickly introduces one of my side projects called neo4j-csv-firehose.
The goal is to enrich Cypher’s great `LOAD CSV` command by adding support for non-csv datasources. For now there’s the capability to use jdbc datasources. In future other sources might be added – think of json, xml, …
It features three deployment modes:
- unmanaged extension: a new endpoint in Neo4j server reads data and renders it into csv for consumption via `LOAD CSV`
- separate server: similar to above, but here the conversion is done outside Neo4j in a small undertow server
- URLStreamHandler: on JVM level direct support for `jdbc:` style URLs is added.
The project’s README should give you all you need to get started. Your feedback is highly appreciated.
Categories
Neo4j cluster and firewalls
This article summarizes the required and optional communication channels for a Neo4j enterprise cluster and provides some sample rules. For the firewall rules I’m using Ubuntu’s ufw package.
As a sample setup we assume the following servers. All of them have 2 network interfaces, eth0 is for communication with outside world, eth1 is for cluster communication.
| name | eth0 ip address | eth1 ip address |
|---|---|---|
| server1 | 172.16.0.1 | 192.168.1.1 |
| server2 | 172.16.0.2 | 192.168.1.2 |
| server3 | 172.16.0.3 | 192.168.1.3 |
access to REST interfaces
By default Neo4j listens on port 7474 for http and on 7473 for https style requests to the rest api. To allow for remote access you need to set in neo4j-server.properties:
org.neo4j.server.webserver.address=172.16.0.1 // or 0.0.0.0 for all interfaces
Inbound access needs to be granted using
ufw allow in on eth0 proto tcp from any to any port 7474
When using SSL the rule needs to hit port 7473 instead.
cluster communication
A Neo4j cluster uses two different communication channels: one for cluster management (joining/leaving the cluster, master elections, etc.) and one for transaction propagation. By default ports 5001 and 6001 are used. On all cluster members we need to allow inbound and outbound traffic for these to the other cluster members:
# cluster management: inbound and outbound
ufw allow in on eth1 proto tcp from 192.168.1.0/24 to any port 5001
ufw allow out on eth1 proto tcp to 192.168.1.0/24 port 5001

# transaction propagation: inbound and outbound
ufw allow in on eth1 proto tcp from 192.168.1.0/24 to any port 6001
ufw allow out on eth1 proto tcp to 192.168.1.0/24 port 6001
online backup
Neo4j enterprise supports online backup – the default port for this 6362. To enable remote backup you need to set in neo4j.properties:
online_backup_server=192.168.1.1:6362 // or 0.0.0.0:6362 for listening also on eth0
The corresponding ufw command is:
ufw allow out on eth1 proto tcp to 192.168.1.0/24 port 6362
ufw allow in on eth1 proto tcp from 192.168.1.0/24 to any port 6362
remote shell
This is pretty tricky. Under the hoods neo4j remote shell uses Java RMI. When a new connection is established the client communicates with server:1337. During this control session a secondary port is negotiated – unfortunately a random port is used. So the client opens a second connection to the server with the negotiated port – therefore we have to open up basically all ports for the ip addresses acting as shell clients:
ufw allow in on eth1 proto tcp from
ufw allow out on eth1 proto tcp to
There might be a more sophisticated approach by implementing a custom RMISocketFactory and register it with the JVM as described in the JVM docs. I have not yet tried this, so if you have explored that path yourself I’d appreciate to hear your solution to this.
TL;DR
The goal of that blog post is to provide a reasonable haproxy configuration suitable for most neo4j clusters. It covers the Neo4j specific needs (authentication, stickyness, request routing) suitable for typically deployments.
Some words for introduction
When running a Neo4j cluster you typically want to front it with a load balancer. The load balancer itself is not part of Neo4j since a lot of customers already have hardware load balancers in their infrastructure. In case they have not or want some easy-to-go solution for that the recommended tool is haproxy.
In a Neo4j cluster its perfectly possible to run any operation (reads and writes) on any cluster member. However performance-wise it’s a good idea to send write requests directly to the master and send read-only requests to all cluster member or just to the slaves – depending how busy your master is.
What we need to cover
These days most folks interact with Neo4j by sending Cypher commands through the transactional cypher end point. This endpoint uses always a HTTP POST regardless if the Cypher commands are intended to perform read or write operation. This causes some pain for load balancing since we need to distinguish reads from writes.
One approach for this is to use a additional custom HTTTP header on the client side. Assume any request that should perform writes gets a `X-Write:1` header in the request. Then haproxy just needs to check for this header in and acl and associate this acl with the backend containing only the master instance.
Another idea is that the load balancer inspects the request’s payload (aka the Cypher command you’re sending). If that payload contains write clauses like CREATE, MERGE, SET, DELETE, REMOVE or FOREACH it is most likely a write operation to be directed to the master. Luckily haproxy has capbilites to inspect the payload and apply regex matches.
A third approach would be to encapsulate each and every of your use cases into an unmanaged extension and use Cypher, Traversal API or core API inside as an implementation detail. By using the semantics of REST appropriately you use GET for side-effect free reads, PUT, POST and DELETE for writes. These can be used in haproxy’s acl as well very easily.
Another issue we have to deal when setting up the load balancer with is authentication. Since Neo4j 2.2 the database is protected by default with username and password. Of course we can switch that feature off, but if security is a concern it’s wise to have it enabled. In combination with haproxy we need to be aware that haproxy needs to use authentication as well for its status checks to identify who’s available and who’s master.
recommended setup
I’ve spent some time to fiddle out a haproxy config addressing all the points mentioned above. Let’s go through the relevant parts below line by line – for the rest I delegate to the excellent documentation for haproxy. Please note that this config requires a recent version of haproxy:
glory details
defining access control lists
The acl declare conditions to be used later one. We have acls to identify if the incoming request
- has http method of POST, PUT or DELETE (l.16)
- has a specific request header
X-Write:1 - contains one of the magic words in the payload to identify a write: CREATE, MERGE, DELETE, REMOVE, SET
- is targeted at the transactional cypher endpoint
store a variable indicating tx endpoint
We do a nasty trick here: we store a internal variable holding a boolean depending on wether the request is for the tx endpoint. Later on we refer back to that variable. The rationale is that haproxy cannot access acls in other sections of the config file.
decide the backend to be used (aka do we read or write)
The acls defined above decide to which backend a request should be directed. We have one endpoint for the neo4j cluster’s master and another one for a pool of all available neo4j instances (master and slaves). A request is send to master if
- the
X-Write:1header is set, or - the request hits the tx cypher endpoint AND it contains one of the magic words.
- it is a POST, PUT or DELETE.
check status of neo4j instances, eventually with authentication
A backend needs to check which of its member is available. Therefore Neo4j has a REST endpoint exposing the individual instance’s status. In case we use Neo4j authentication the requests to the status endpoint need to be authenticated. Thanks to stackoverflow, I’ve figured out that you can add a Authorization to these requests. As usual, the value for the auth header is a base64 encoded string of “<username>:<password>”. On a unix command line use:
echo "neo4j:123"| base64
In case you’ve disabled authentication in Neo4j, use the commented lines instead.
stickyness for tx endpoint
Using our previously stored variable, we get the value back and use it to declare an acl in this backend. To make sure any request for the same transaction number is sent to the same neo4j instance we create a sticky table to store the transaction ids. You might want to adopt the size of that table (here 1k) to your needs, as well the expire time should be aligned with neo4j’s org.neo4j.server.transaction.timeout setting. It defaults to 60s, so if we expire the sticky table entry after 70s we’re on the safe side. If a http response from the tx endpoint has a Location header we store its 6th word – that is the transaction number – in the sticky table. If we hit the tx endpoint we check if the request path’s 4th word (the transaction id) is found in the sticky table. If so, the request gets send to the same server again, otherwise we use the default policy (round-robin).
define neo4j cluster instances
These lines hold a list of all cluster instances. Be sure to align the maxconn value with the amount of max_server_threads. By default Neo4j uses 10 threads per CPU core. So 32 is a good value for a 4 core box.
haproxy’s stats interface
Haproxy provides a nice status dashbord. In most cases you want to protect that with a password. 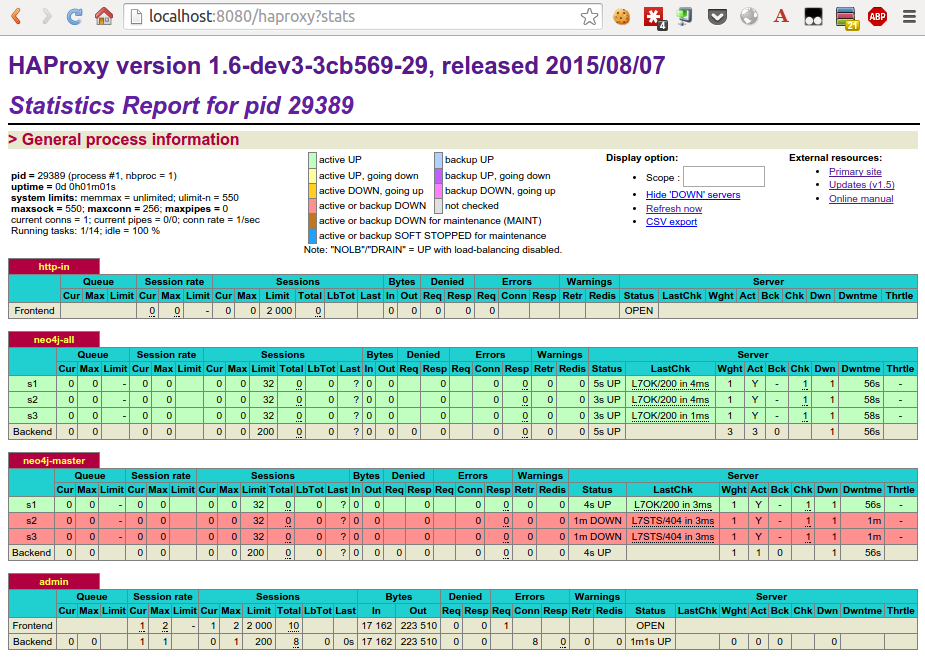
Conclusion
I hope this post could provide you some insights on how to use haproxy in front of a neo4j cluster efficiently. Of course I am aware that my experience and knowledge with haproxy is limited. So I appreciate any feedback to improve the config described here.
Update 2015-10-13
Based on couple of questions I should have more clearly mentioned that the sketched setup requires a haproxy 1.6 which is currently in development.
Update 2015-11-09
Haproxy 1.6 has been released GA on Oct 23rd – so no need to use a in-dev version any more.
Update 2016-10-18
There’s a docker image providing a preconfigured haproxy for neo4j available at https://github.com/UKHomeOffice/docker-neo4j-haproxy. Kudos to Giles.
At a onsite workshop with a new potential customer in wonderful Zurich I was challenged with a requirement I’ve never had in the last few years with Cypher.
Since I cannot disclose any details of the use case or the data used let’s create an artificial example with a similar structure:
- a restaurant has several rooms
- each room has various tables
- each table is occupied with 0 to 6 guests
The goal of the query is to find the most occupied table for each room. As an example, I’ve created a Neo4j console at http://console.neo4j.org/r/ufmpwi.
The challenging here is that we want to do a kind of local filtering: for a given room we need the most occupied table. Calling the reduce function to the rescue. The idea is to run the reduce with 3 state variables:
- the index of the highest occupation so far
- the current index (aka iteration number)
- the value of highest occupation so far
RETURN reduce(x=[0,0,0], i IN [1,2,2,5,2,1] |
   CASE WHEN i>x[2] THEN [x[1],x[1]+1,o] ELSE [x[0], x[1]+1,x[2]] END
)[0]
Reduce allows just one single state variable to be used but we can use a three element array instead (which is one variable 🙂 ). When the current element is larger than the maximum so far (aka the 3rd element of the state), we update the first element to the current position. The second element (current index) is always incremented. If the current element is not larger then the maximum so far, we just increment the current count (2nd element) and keep the other values:
The full query is:
MATCH (:Restaurant)-[:HAS_ROOM]->(room)-[:HAS_TABLE]->(table)
OPTIONAL MATCH (guest)-[:SITS_AT]->(table)
WITH room, table, count(guest) AS guestsAtTable
WITH room, collect(table) AS tables, collect(guestsAtTable) AS occupation
RETURN room, tables[reduce(x=[0,0,0], o IN occupation |
   CASE WHEN o>x[2]
      THEN [x[1], x[1]+1,o]
      ELSE [x[0], x[1]+1,x[2]]
   END
)[0]] AS mostOccupied, tables, occupation
The first line is pretty much obvious. Since there might be tables without guests OPTIONAL MATCH is required in line 2.
Cypher does not allow you to do direct aggregations of aggregations. Using multiple WITH helps here. In line 3 we first calculate counts of guests per table. Line 4 returns one line per room with two collections – one holding the tables, the other their occupation. Note that both collections do have the same order. Finally from line 5 on the reduce function is applied to find the most occupied table in each room.