This year’s christmas holiday project was to install a “personal archive” tool. My choice is a tool called paperless. This post describes how I deployed to my existing FreeNAS box in order to help others with similar setups and have a documentation on the setup for myself.
Motivation
From a lot of companies/organizations you receive a lot of paper and electronic documents over time. Most of those need to be archived and/or for legal reasons. Access to these documents happens rather rarely e.g. when your tax consultant finishes up the income tax declaration she needs some of those, e.g. “I need the receipt from electricity provider xyz for year 2017”.
If you’ve ordered your documents nicely chance is that you can find them rather quickly. However I’m not a pedantic bureaucrat – so the search for a specific document is more a “all the things scan” than a simple index lookup. I need to go through stacks of paper – which is annoying and time consuming.
Requirements
The overall goal is to minimize the manual effort to find documents. Basically I want to drop electronic documents “somewhere” and scan paper documents when they arrive. A system should pick them up, OCR them if needed, generate a fulltext index.
There are existing cloud based solutions which seem to be very easy to use. However I don’t want all my personal documents being stored in the cloud. These contain sensitive information – think docs from your health care insurance or your salary statements – something I absolutely want to keep on prem.
Solution overview
A quick research in open source space drove my attention to paperless. It is simple, solid, not feature convoluted and covers my needs very well. Paperless is written in python. Aside from a classic installation, docker images are available.
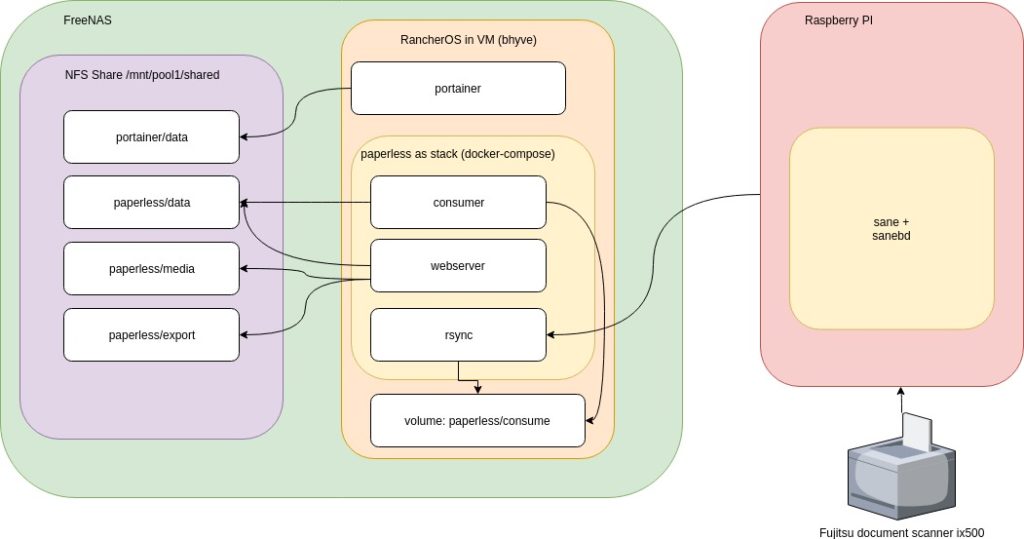
The right runtime environment in my case is hosting paperless on a FreeNAS box at home. This NAS runs 24×7 anyway. The hardware consists of a Quad-Core Intel Atom CPU board, 2 SSDs and 4 x 6 TB HDDs.
FreeNAS allows for running virtual machines, so I wanted a VM running RancherOS. For ease of managing docker containers I wanted to have portainer in the game. In portainer you can deploy “stacks” based on docker-compose files. Rsync is used to transfer documents into paperless.
For scanning documents I’ve purchased a Fujitsu ix500 document scanner based on reviews and recommondations from paperless user community. Since FreeNAS/FreeBSD does not allow for selective USB device passthrough to virtual machines I needed to connect the scanner to separate hardware. Luckily I have a Raspberry PI managing my smart home devices.
A quick overview diagram would roughly look like this:
Implementation
Running RancherOS and portainer on FreeNAS
There’s a excellect three part video series on this from Keith Walker. Just follow the steps outlined there. When finished you’ll have portainer.io running inside a VM hosting RancherOS.
Creating necessary docker volumes
SSH into your rancheros and create 3 volumes using NFS bind mount and one “normal” volume for paperless’ consume folder. The consume folder cannot reside on NFS since paperless is using inotify which is not supported on NFS:
docker volume create --name paperless_data -o type=none -o o=bind -o device=/mnt/nfs-1/paperless/data
docker volume create --name paperless_media -o type=none -o o=bind -o device=/mnt/nfs-1/paperless/media
docker volume create --name paperless_export -o type=none -o o=bind -o device=/mnt/nfs-1/paperless/export
docker volume create --name paperless_consume
Custom portainer template for paperless
Connect to your portainer UI (http://rancheros:9000 in my case) and go to “App Templates”, press “Add template”

Create a custom template using the Compose Stack button and provide these settings:
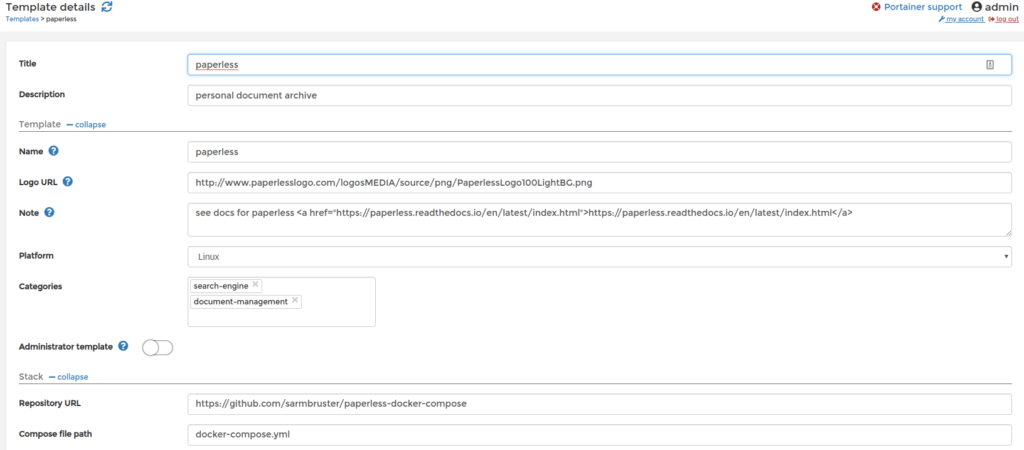
Basically you’re referencing a simple docker compose file located at https://github.com/sarmbruster/paperless-docker-compose – this basically wraps the original docker compose file from paperless with some small modifications to use our previoously defined docker volumes and to make it “NFS friendly” by amending the “nocopy” option.
Note that the docker compose file also starts a container exposing a rsync port to the consume volume. This is the primary interface to upload files into paperless. We’ll use it below in the scanner script.
Installing paperless
With all the preparation work we’ve done so far, running paperless is as easy navigating to our new created template and press “Deploy the stack” button. It will take some time to download all the docker images and start them. Finally you should see the following containers:
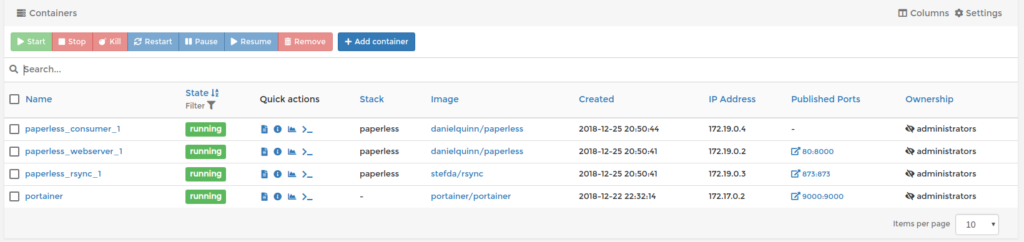
The final step for paperless is to create a super user account in paperless. Press the >_ button for paperless_webserver_1 in “quick actions” and start a console and type ./manage.py createsuperuser.
Scanning on the RaspberryPI
Last but not least we need to configure the RaspberryPI to operate the scanner. The RapberryPI has openhabianPI installed which is basically a Debian stretch. First we need to install a few packages for operating the scanner:sudo apt install sane sane-utils scanbd
It turns out that the scanner button daemon (scanbd) shipping with Debian stretch is version 1.4.4 which has a bug fixed in 1.5 regarding USB disconnect/reconnect. Therefore I’ve manually downloaded scanbd 1.5.1 from https://packages.debian.org/buster/scanbd and installed it via dpkg.
For processing the scans I’m using https://github.com/rocketraman/sane-scan-pdf – a nice tool which leverages a flexible toolchain to do deskewing, unpaper, OCR, remove empty pages and some more. Download the two scripts there to /usr/local/bin.
Next we need to have a handler script that is called when the scanner’s scan button is pressed. Create a file /etc/scandb/scripts/sane-scan-pdf.scriptwith these contents:
logger -t "scanbd: $0" "Begin of $SCANBD_ACTION for device $SCANBD_DEVICE"

scanner=$(echo "$SCANBD_DEVICE" | cut -d ':' -f 1)
SANE_CONFIG_DIR=/etc/scanbd /usr/local/bin/scan -d -s A4 --unpaper --ocr --deskew --crop -v \
   --skip-empty-pages -o "/tmp/`date +%Y%m%d%H%M%SZ` - generic.pdf" 2>&1
rsync -av --remove-source-files /tmp/*pdf rsync://rancheros/volume

logger -t "scanbd: $0" "End   of $SCANBD_ACTION for device $SCANBD_DEVICE"
The script triggers processing of the scanned pages and finally assembles a pdf that is moved to the consume folder we’ve set up previously.
Last step is to tell scanbd about our new script. Modify in /etc/scanbd/scanbd.conf the script for “action scan” to:
action scan {
    filter = "^scan.*"
    numerical-trigger {
        from-value = 1
        to-value   = 0
    }
    desc   = "Scan to file"
    script = "sane-scan-pdf.script"
}
Conclusion
Of course we could have installed papersless directly from source in a FreeBSD jail using iocage. I’ve choosen the dockerized variant for an easier setup procedure and of course for self-eductation as well.
I hope this lengthy post provides some help to install your own personal document archive.
11 replies on “Running Paperless on FreeNAS”
Hallo Stefan,
habe nach der Beschreibung das System bis zum Raspberry zum Laufen bekommen. Super Beschreibung! Aber jetzt kommt mein Problem:
Was muss ich machen, damit ich ein Client-Verzeichnis nutzen kann, wo ich die PDF’s einfach reinkopiere und sich Paperless dann die Dateien abholt?
Gruß
Frank Salentin
Hallo Frank,
das scanbd script `/etc/scanbd/scripts/sane-scan-pdf.script` enthält am Ende einen rsync-Befehl: `rsync -a –remove-source-files /tmp/*.pdf rsync://rancheros/volume`. Damit wird das pdf in das consume-Volume von Paperless kopiert (deswegen habe ich ja einen rsync Docker-Container). Paperless nutzt inotify und stößt bei neuen Dateien im Verzeichnis den Import automatisch an. Wichtig zu wissen, dass der consume Ordner kein NFS/CIFS Dateisystem sein darf, da inotify nur bei “normalen” Dateisystemen funktioniert. Siehe dazu auch die Paperless-Docu https://paperless.readthedocs.io/en/latest/consumption.html.
Gruss,
Stefan
Hallo Stefan,
genau das mit dem “rsync” hatte ich irgendwie überlesen. :-/
Noch eine Anmerkung:
Ich bin über 2 Stellen im Tutorial gestolpert.
1.) Zum einen hatte ich Probleme, das Custom-Template zu erstellen. Hier sollte vielleicht erwähnt werden, dass man noch auf den “Compose Stack”-Button klicken sollte. Ich als Newbie bin daran verzweifelt.
2.) Um den Superuser in Paperless anzulegen, nicht ./migrate.py sondern ./manage.py eingeben.
Gruß
Frank
Hallo Frank,
vielen Dank, ich habe deine beiden Punkte im Text entsprechend angepasst.
Viele Grüße,
Stefan
Hey, glad to see someone using the scan script I wrote. Nice setup.
And thanks for the helpful scanner script 🙂
Hallo,
hast Du mittlerweile nach fast einem Jahr eine Langzeiterfahrung wie das System funktioniert?
Vielen Dank.
Martin
Hallo Martin,
ich bin mit dem Setup sehr zufrieden. Inzwischen bin ich die das offizielle Dockerimage `thepaperlessproject/paperless` umgestiegen. Die Upgrades waren schmerzfrei.
Paperless hat mir bei der letzten Steuererklärung sehr viel Zeit gespart. Einfach alle Dokumente, die ich mit “Steuer” getaggt hatte zur Steuerberaterin und mein Teil war erledigt.
Wichtig ist IMO sich die Tags gut zur überlegen.
Gruss,
Stefan
Following your guide here, after following Kevin’s videos for setup, I had issues with the volumes mounting with the commands above. Figuring something might have changed, it was easy enough, to create a user with an appropriate uid for the host, and create the folders manually in the nfs share. I created a single paperless directory owned by share uid 1020 and then added the data, media, export directories, finally running the commands again to create the volumes and it worked. Thanks for the write up!
First I’d like to thank you for your efforts in writing this howto. Maybe I can contribute a little bit.
I had trouble to get this setup running as there seems to be a problem when creating the tables in the sqlite-db. I managed to solve this problem after I read somewhere a hint to run the migrate script. So you have to log in to your webserver container (mine is named paperless-webserver):
docker exec -it paperless-webserver bash
and then execute
./manage.py migrate
This creates all tables. After that, I had to wait until the consumer-container had restarted (restart policy is set to ‘always’ so I just had to wait a couple of seconds) and when I saw through “docker logs -f paperless-consumer” that the container did not have problems anymore, I could go to the step “./manage.py createsuperuser”
Still, I seem to have a permission issue, because the startup scripts tells me something about “Changing group permissions of export directory: /export”
Guess I have to find out which user runs the container in rancherOS and adjust the permissions accordingly.
PS @Rob Slippey:
I too had to create the folders manually in the nfs mount, following the aforementioned YouTube video